Forcing left shell
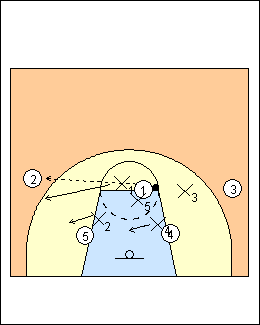
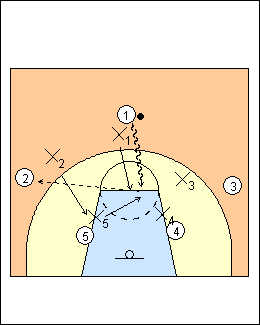
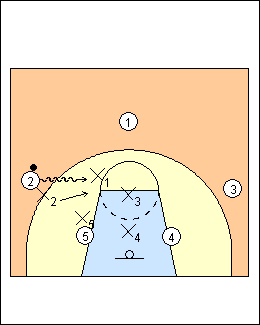 | 1 Ian MacKinnon Forcing-left shell drill to work on drive-and-kick situations, see Defence - Forcing left basics, Help rotations. For 3-on-3 help rotations, see Defending - 3 on 3 kick-out, 3 on 3 take a charge. 1) 3-out 2-in a) Middle drive from the (defensive) left wing 2 has the ball to start, - X2 forces left - X1 gaps - X3 and X4 are on the midline - X5 defends 5 in the low post 3/4 high side. |
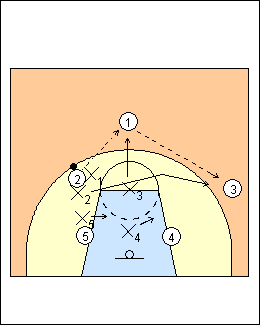 | 2 When 2 passes, X1 stays with 2, X3 takes first pass (to 1 or 3), X2 (who got beat) goes opposite the pass and has leftovers, he takes whichever attacker is left open, here 3. If 2 passes to 3, X3 takes him and X2 covers 1. 1 passes to 3. Andy Sparks - X1 helps and stays if 1 spaces away on the drive (drifts), - X1 helps and recovers if 1 stays, - X1 and X2 switch if 1 rotates behind the drive (Euro), - if 1 cuts backdoor, help comes from the top of the i (X3). |
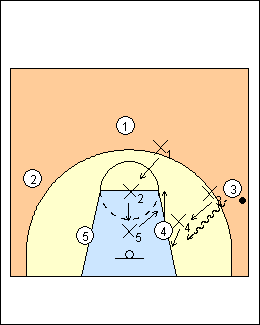
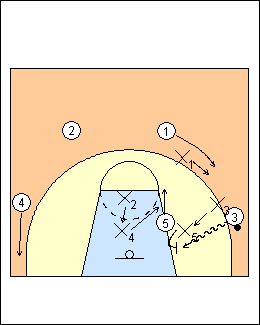
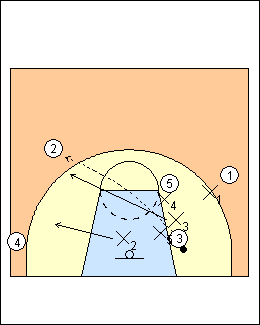
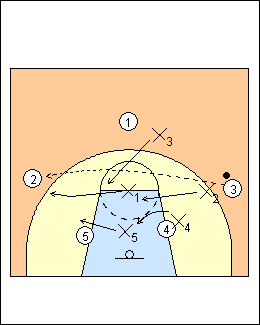 | 3 X2 forces ballhandler 3 left, X3 denies 1, X1 and X5 are on the midline, X4 full fronts 4 if the ball is above the line of 45 or defends 3/4 from the bottom if the ball is below 45. 3 skip passes to 2, repeat (perimeter defenders have changed positions). See Defending - Fratello 3 on 3 drive and kick. |
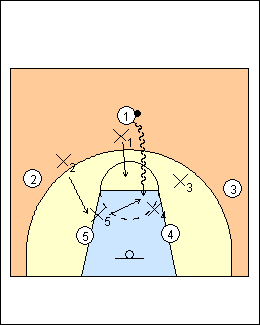 | 4 b) Drive from the top 1 beats X1 with his left hand, X3 stays with 3 (a shooter), weakside X5 helps (not X4) and X2 shoots the gap (covers down) to help the helper. |
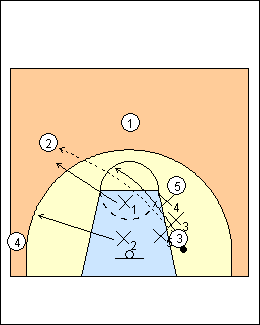
 | 5 On a pass to 2 (a difficult pass), X5 stays with 1, X2 fronts 5 (a mismatch), beaten man X1 chases the pass to take 2, the attacker left open (there is only one open attacker). X5 and X2 stay with (switch to) 1 and 5 who are close to the basket. |
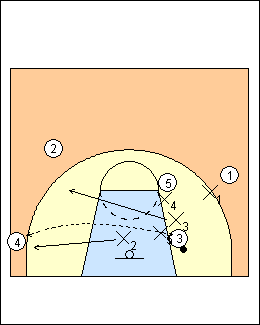
 | 6 c) Baseline drive from the right wing X4 fronts 4 if the ball is above 45. As 3 drives baseline, X4 gets to 3/4 low side then traps 3 with X3, X5 takes 4 who i-cuts to the elbow on the drive, X2 sinks to cover 5 and X1 fills. This can be done 3-on-3 with 3, 4 and 2 and defenders. |
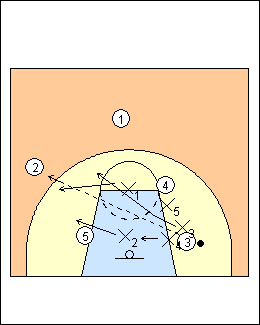 | 7 X1 has first pass out of the trap to 1 or 2, X3 goes opposite the pass and has leftovers. Here the pass goes to 2, X1 takes him and X3 covers 1. X2 stays with and full fronts 5 (a mismatch), X4 stays with 3 and X5 stays with 4 (a switching help rotation). There is a five-man rotation, all defenders have new checks. See Defence - Mavs (halfcourt). |
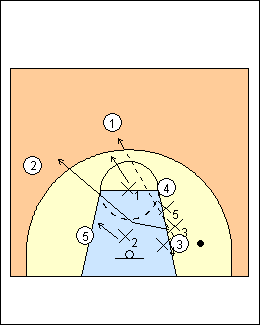 | 8 Here the pass goes to 1, X1 takes him and X3 covers 2 (a four-man rotation). |
 | 9 Progression To combine all three situations and go competitive, 1 drives from the top and passes to 2 who will then drive middle, the ball is passed to 3, play is live on the baseline drive and kick by 3. Three attacks then switch teams, keep score. This can be done using 4-out 1-in spacing, 5 crosses the lane (see below). See Defending - 3 on 3 kick-out. |
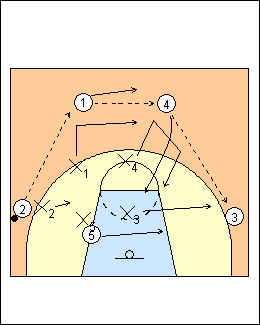 | 10 2) 4-out 1-in motion The ball starts with 2 and is reversed, 4 basket cuts on the pass to 3, X4 jumps to the ball, 1 and 2 fill behind 4, X1 denies a pass from 3 to 1. On the pass from 2 to 1, X2 gaps to help defend a pass into the ballside low post, and gives up a return pass to the wing. The offence should want to swing the ball to the other side, not back to the same wing. This can be a match-up decision. Andy Sparks - X2 opens up, then denies 2. (Variations) - to start, reverse the ball from 2 to 3, skip it back to 2, repeat or rotate players, then add dribble penetration, - 2 drives left and kicks to 1, who drives left and kicks to 4, who drives left and kicks to 3. Andy Sparks - help and recover on a left-hand drive from a slot. |
 | 11 X4 stops on the midline when 4 clears weakside. 3 drives baseline and is trapped by X3 and X5, X4 takes 5 on the i-cut, X2 sinks. Andy Sparks - help X5 takes away the baseline drift pass, on-ball defender X3 takes away the 45-degree pass. |
 | 12 X2 takes a pass to "baseline most" 4, the weakside attacker closest to the baseline, X3 takes 2 on the pass. There is a four-man rotation, only X1 stays with his man. |
 | 13 If the pass goes to 2, X3 takes him and X2 again covers baseline-most 4. Option - X3 bumps X4 to 2, depending on spacing. If X2 were to take 2, then 4 would be open cutting to the basket. (Variation - X2 can take a pass to 2 since 4 is not close to the basket) Andy Sparks - if 2 passes to 4 in the corner, X2 locks it in, don't force left. |
 | 14 If 1 doesn't fill behind the drive, X1 could be closer to 2 than X3 is and would take 2 on the pass (for a five-man rotation). X1 would also take a first pass to 1, and X3 take 2. X2 would take a first pass to 4, X1 take 2 and X3 take 1. Progression - rotation to and from help on a baseline drive from the wing with weakside low post, see Defence - Forcing left. Ben Jacobson - X1 is the centre-fielder, one step below the line of a pass to next player 2 (not 1). See Defending - Pistons innings (out of a post double-team) - X1 takes a pass to 1, X2 has next weakside attacker 2, X3 takes weakside corner 4. |
This page was made with Basketball playbook from Jes-Soft