Forcing left basics
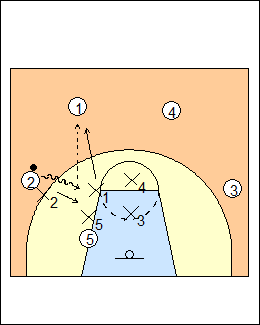 | 1 Force every ballhandler to dribble with their left hand, gap on a pass to the attacking left, deny a pass to the right. Most right-handers are much less effective dribbling (and passing) to their left. Force left by splitting the right foot, jump back (pop off) on a jab step right, drop step on a jab left. Try to dictate what the offence will do, with full denial right, allow reversal passes to the left, then lock in the ball and trap a baseline drive. See Defending - Forcing left shell, Defence - Dave Smart weak-hand, also Mike MacKay - Force-left defence (pdf). If 2 has the ball, - X2 forces left (left foot closer to the baseline then 2's bottom foot, angling 2 towards the top of the arc), and takes away a pass to 5's left hand - X1 gaps left - X4 and X3 split the floor in "sight" (help) positions, seeing their checks and the ball (a weakside "i"), optionally X4 and X3 can widen out with X1 in the gap - X5 defends 5 in the low post 3/4 high side, taking away a pass to 5's right hand (on a post feed, X5 would jump behind and force 5 to his left hand). Gap defender X1 helps and recovers if 2 beats X2 to the middle with his left hand (shown). Variations - gap on both sides of the ball against good dribble penetrators, especially when the ball is out top (protect the paint) - deny on both sides to increase pressure. Dick Bennett - the game is now more north-south than east-west (motion), players try to get into the paint, Get into pack defence, then when the ball is on a side get into push (pressure) defence (force baseline, deny reversal), he had success with this. |
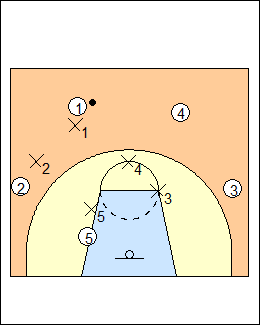 | 2 If 1 has the ball, X1 forces left, X2 denies 2 (on the line, up the line), X5 denies 5, X4 gaps, X3 is in a help position. Randy Sherman - with the ball on the perimeter, X2 denies about halfway up the line to deter dribble penetration. If 1 attacks the gap, X2 stays in deny stance, backs into the gap and plugs it with his butt, allowing him to maintain sight of 2. |
 | 3 If 4 has the ball, X4 forces left (toward the sideline), X1 denies right, X3 gaps left, X2 is in help, X5 is on the line, up the line. |
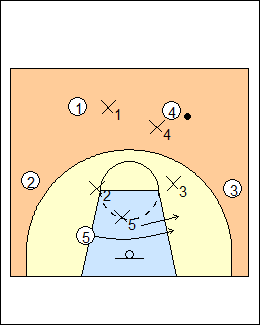
 | 4 Here 3 has the ball and 5 is ballside. X3 forces left (left foot above 3's top foot, angling him towards the short corner), X4 denies right, and X1 and X2 form a weakside "i". X5 has to be in position to prevent a post entry and help on a baseline drive, fronting (shown, X2 is the help on a lob pass), or low side (go in front or behind 5, X4 denies ball reversal to prevent a duck-in). Randy Sherman - X3 forces (influences) 3 to a baseline checkpoint outside the lane line (the short corner), he does not give up baseline. X1 and X2 should be on the (far) lane line if the ball is above the foul line (in a closed deny stance), and on the midline if the ball is below the foul line. |
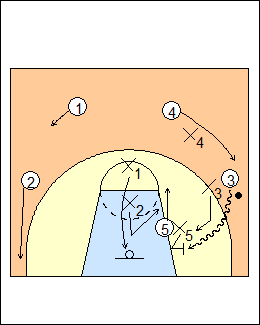 | 5 On a baseline drive by 3, offensively 2 drifts to the weakside corner, 5 i-cuts up to the elbow, 4 fills behind the drive, and 1 gets to 45 degrees on the weakside. Defensively, X5 traps with X1, low sight defender X2 helps the helper by taking 5 on the i-cut, X4 stays with 4 filling behind, and X1 sinks to ball level (covers down), taking away a pass to 2. Top-of-the-i X1 has baseline-most 2, except if 1 is a dangerous shooter, then optionally X1 drops toward ball level but stays in the passing lane, forcing 1 to move to get open. If 5 makes an early i-cut to get out of the way (or if X5 is not involved in the help rotation), X5 would stay with 5, and X2 trap with X3. Greg Francis - with a ballside low post, X5 shows, the other defenders shrink the floor to make a pass to 5 difficult, all payers recover to their own checks. In all other situations, X5 does not help, you give up too many offensive rebounds to 5. Also, don't help off a shooter in the ballside corner, his defender should be in an open stance with arms wide to shrink the driveline, then recover on a pass to the corner (don't step toward the driver, help comes from the weakside). |
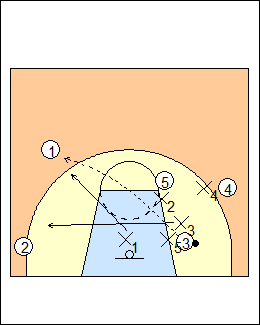 | 6 Closest man X1 takes a weakside pass to 1 or 2, beaten defender X3 has leftovers, rotating out of the trap to take the remaining attacker (here 2). X5 stays with 3, and X2 stays with 5. Only X4 stays with his check. If 2 is close to the basket, X1 would stay with him, and X3 take a pass to 1. |
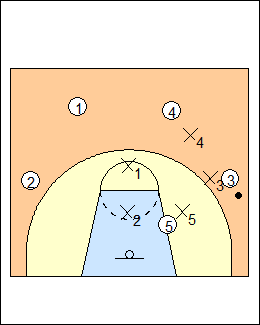
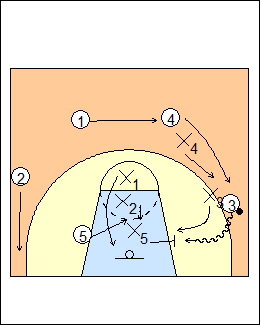 | 7 Here 3 has the ball and 5 is still weakside, so X1, X2 and X5 are all in sight positions (a "triple i"), X5 is ballside. On a baseline drive, offensively 5 goes to the dots in the middle of the lane, 1 rotates over above the ball, 4 still fills behind, and 2 drifts to the corner. Defensively, X5 still traps, X2 takes 5, and X1 sinks to ball level, covering a pass to 2. |
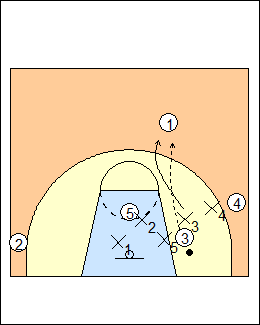 | 8 X3 takes a ballside pass to 1 (the only attacker left open), X2 does not leave 5 who is close to the basket. X1 would take a weakside pass (to 2) and X3 take 1 (leftovers).  |
This page was made with Basketball playbook from Jes-Soft