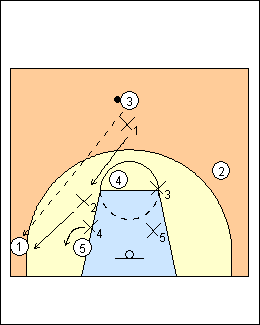
1-2-2 slider
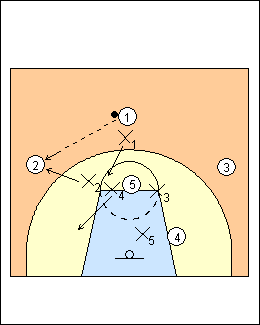
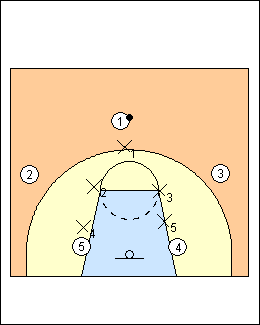 | 1 The 1-2-2 slider zone can pressure the ball outside, and be effective against good outside shooting. All five defenders cover the perimeter. Slider (superman) X1 plays between the ball and the basket. He is the best perimeter defender, and should be tall enough to cover the low post. X1 must get the ball out of the middle (force weak-hand), as the high post is vulnerable when the ball is out top. Because most offences are right-handed, X2 is usually the second-best perimeter defender, and X4 will have to cover perimeter players (the corner) more often than X5, who should be the better rebounder and inside/high-post defender. See Defences - Tubby Smith 3-2, Jack Bennett 3-2, St. Joseph's 1-2-2, also Pistons match-up, Auburn match-up, Lute Olson 1-1-3, Paul Hewitt point zone. For more on trapping, see Defences - 1-2-2 slider traps, 1-2-2 slider halfcourt. |
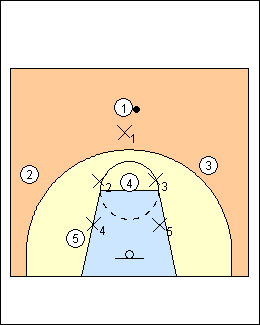
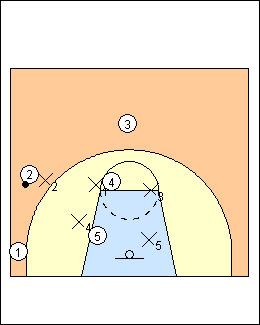 | 2 One defender pressures the ball, the other four protect the paint. Other keys (see Pistons match-up): - deny dribble and pass penetration, but not non-penetrating passes - give help but contest every shot, no layups, no second shots - call the cutters, force them behind - with an attacker in your area of the zone, triangle ball-you-man (the farther the attacker is from the ball, the flatter your triangle) - help position is butt to the baseline - if there is no attacker in your area, protect the basket or look to help (or bump) a teammate - front or 3/4 low and high post attackers - hands up, thumbs outside your ears. X2 takes the ball on the wing, forcing baseline, X1 drops to the ballside elbow area, X4 fronts or plays outside the low post, he has to close out on a pass to the corner. Tubby Smith - X4 plays outside low-post 5, staying away from him, butt to the baseline, guarding 5 with his inside hand. Pistons - X4 would take 4 and X5 take 5. Jack Bennett - X3 and X5 have a foot in the lane with vision, X1 is parallel to the ball. X4 dead fronts or 3/4's a low post. On a pass into the low post from the wing there is a natural double team by X1 and X4 [except if X4 is fronting, then trap with X5]. Lute Olson - the post defender is always on the line of deployment between the ball and the basket, he doesn't shade to either side. He has to close out on a pass to the corner. Pistons - in a man or zone defence, when the ball is on the wing there should be defenders at the ballside block and elbow ("early fill"). On a shot, there are two weakside rebounders and X1 can cover the top, but ideally the defence wants to create a rebounding triangle with three defenders to control the boards, making contact and creating a buffer. Since X4 is fronting 5 and can't box him out (but can come back to the middle), optionally rotate X5 to 5 on the shot and X3 low weakside. Lute Olson - if there is a shot from the wing, the guards rotate away from where the shot is taken, X1 nails a high post or a weakside attacker, X4 can't box out 5 because he is fronting, he drop steps and attacks the rim. If there is only one weakside attacker, X5 can nail 5. |
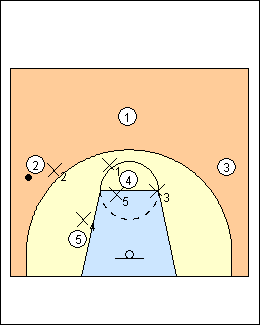
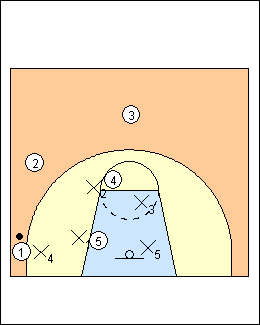 | 3 With the ball in the corner, X4 closes out and takes away baseline (Tubby Smith), slider X1 drops down to cover the low post (usually fronts, or plays behind a non-shooter), X5 covers weakside low. X2 covers the ballside high post, he does not deny a pass out of the corner. With a conventional 1-2-2, X5 covers the low post, X1 the elbow, and X3 drops down for weakside rebounding. X5 and X4 are on a string. Paul Hewitt - front a low post when the ball is in a corner, or play behind a non-shooter. Tubby Smith - on a pass to the corner, X4 can't go out until the ball is in the air, X1 anticipates having to move down. If 5 seals him, X4 will release and go under, don't fight over top, X1 is coming down the high side. X4 closes out baseline side, giving X1 time to get down. Jack Bennett - if X1 is late getting to 5 and there is a pass inside, X5 comes across and X3 sinks. Lute Olson - if 1 dribbles out of the corner, X2 calls off X4, usually on about the second dribble (teams will drag you out on the dribble then bring a cutter underneath). St. Joseph's - if an attacker in the corner dribbles out, X2 guards him aggressively, tries to keep him from leaving that area, making strong contact. Paul Hewitt - instead of staying with the ball on a non-penetrating dribble out of the corner, another approach is to bump (pass off), which keeps forwards low. When 1 dribbles out of the corner, X2 tells X4 to bump down. Dean Smith (point zone) - X4 goes back out of the corner with 1 about one step, X2 runs at him to get him to pick up the dribble, X4 backs off. |
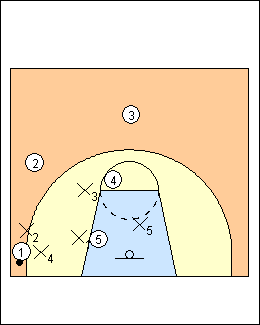 | 4 Optionally trap in the corner, X2 follows a pass from 2 to 1 and traps with X4, weakside X3 covers the high post, replacing X2. X1 and X3 are interceptors, X5 is the safety. More aggressively, X3 could deny a pass out to 2 on the wing, and X5 rotate up to cover the high post area. Situational trapping - trap only the defensive left corner, where an attacker would have to dribble out with his left hand (Flip Saunders - after the first trap opposing coaches may tell their players to keep the ball out of both corners) - trap the defensive right corner with bigger defenders X5 and X3 - trap a shooter (Seth Greenberg 1-3-1). Tubby Smith - trap when the ball goes below a wing defender. Lute Olson - trap a pass to the short corner every time, X5 has the basket area. St. Joseph's - "3" is a normal 1-2-2 zone, "31" applies a trap on the first pass when the ball is passed below the free-throw line extended. Pistons - on a corner trap, cover the low block, elbow, and protect the basket from lobs. |
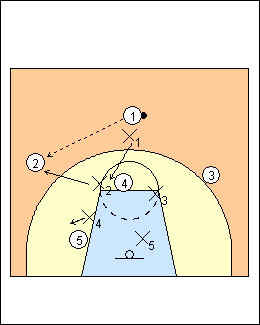
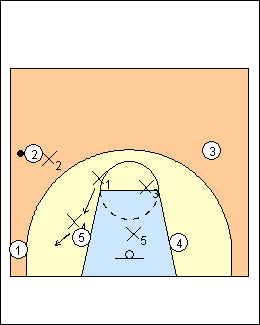
 | 5 The wings try to take any skip pass. If 1 skip passes to 3, X1 can't get there in time, so X3 closes out and X1 takes his place or bumps him back to the elbow. See Jack Bennett, Tubby Smith, St. Joseph's. |
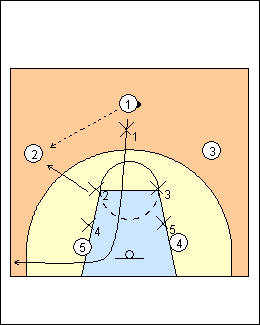
 | 6 Defenders triangle defenders in their area. Here X2 sinks with no attacker on the wing, and closes out on a skip pass to 1. X4 stays with the low post, slider X1 covers the elbow (a 3-man rotation). If X4 goes out on 1, 5 would be open inside, X1 can't get there in time. Basically X2 takes first pass to his side of the floor. Tubby Smith - X2 stays with 1 if he dribbles out. |
 | 7 High post By default, cover the high post with X2 and X3 when the ball is out front, similar to a 2-3 zone. X5 has no one in his area, but will close out on a pass to 4, and X1 dig or trap with X5. Variations - X5 closes out only if 4 catches and faces the basket - X5 comes up 3-4 feet behind 4 before or on a catch - X2 and X3 can attack the ball if 4 puts it on the floor. basketcoach.com - if 1 passes to 4, low X5 comes up to trap with X1. Geno Auriemma (2-3 zone) - the guards should stay on the elbows and not go near the ball if there is a pass into 4, the middle defender comes up only if 4 turns to face the basket, and most high posts don't turn around on a catch. You would rather give up a shot by 4 than a 3-point shot. Lute Olson - on a pass to the high post, both guards cover the pinch areas, the middle defender moves up about 4 feet away. If the high post turns and faces, the middle defender is in his face, he has no responsibility for a drive. If 4 puts the ball on the floor, the guards get it. Paul Hewitt - the middle defender is behind 4, but not too close, about 3 feet away. On a pass to the high post, the middle defender has him, play straight up, hands up, use length to contest a shot but also for distance, so you don't get beat off the dribble. The guards go after 4 as soon as he puts the ball on the floor, it's an opportunity for a deflection or steal. The defence is most vulnerable when the ball is in the middle of the zone, off-ball defenders have to be really alert, turn it into a disadvantage for the offence. Dean Smith - they would go straight man-to-man on a high-post catch, the middle defender takes 4. Syracuse 2-3 - a shot from the high post is not bad for the defence, the ball is in the middle and they have rebounding position. |
 | 8 X1 covers the high post on a pass to the wing. If 1 dribbles to the wing, X1 hands him off to X2, who tells X1 to bump down (or X2 traps with X1). Auburn - if 1 dribbles from the point to the wing, X1 guards the ball for three dribbles then changes with X2. St. Joseph's - if 1 dribbles to the wing, X2 guards him aggressively and makes physical contact or else jumps in his path. Paul Hewitt - on a penetrating dribble you have to stay with the ball. |
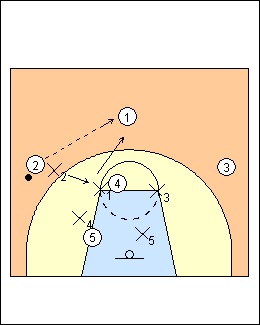 | 9 On a pass back to the point, X2 covers the high post, which leaves X3 to defend 3 on ball reversal. Variations - weakside wing X3 takes the high post (coachesclipboard.net) - X1 stays with the high post, X2 takes the ball (St. Joseph's). See Syracuse 2-3. Lute Olson - on a pass out top, X1 counts to two then closes out, giving X2 time to cover the high post (this is the hardest slide). |
 | 10 Another option with the ball out top is to cover a high post with the back defender who does not have an attacker in his area, here X4. If 1 passes to 5, trap with X1 and X4 (or X1 digs). Tubby Smith - if there is a flash to the high post, the low defender on that side comes up too, there is nobody behind him, he has to find somebody to guard, it becomes a 1-3-1. X2 sinks back to see 2 and guard him on a backcut. X1 would pinch on a pass to the high post. Pistons - if the offence uses a 1-4 set, bring up both low defenders. On a pass to 2, X2 closes out, X1 drops down to cover the high post, X4 recovers to the ballside low post. If 5 and 4 x-cut, X4 has 5 and X1 has 4 at the high post. |
 | 11 Variation - X5 goes with 4 on an x-cut. X1 is the "jam" guy, open to the ball with his left hand in the passing lane to 4 and his left leg on top of 4's right leg, but he can't get pinned by 4 on a skip pass. X3 triangles 3. See Pistons match-up, also Paul Hewitt point zone. Tubby Smith, Auburn - X2 would stay with 2 if he dribbles to the corner, and back out. |
 | 12 2-3 attacking set (three deep) 1 passes to 2 and cuts to the ballside corner. |
 | 13 X1 has no one out top or at the high post, he slides down, and can bump X4 to 1. X1 stays low if the attacking team plays with two low posts and a baseline runner. See Tubby Smith 3-2. |
This page was made with Basketball playbook from Jes-Soft