1-1-3 Lute Olson
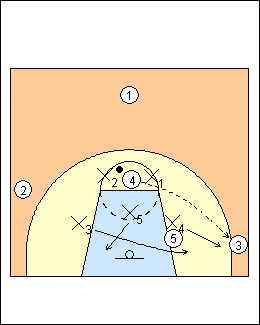
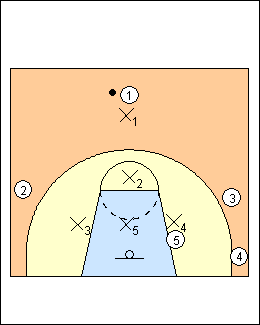 | 1 Lute Olson 1-1-3 zone - defence starts with good ball pressure - deny all penetrating passes, force baseline - close-out to take away middle penetration, hands up to take away a pass by your ear - steals come from deflections - deny the post, front in the low post area (straddling the first marker or lower) - the defender with the post is always on the line of deployment between the ball and the basket, he doesn't shade to either side - jump to the ball, weakside vision - anticipate ball movement, but don't move on fakes - never let a strongside cutter go in front of you - communication is critical - the on-ball defender yells ball on every pass - defending the ball on the wing, don't allow a penetrating or skip pass - defenders have hands up, like thumbs out of their ears. The 1-3-1 zone gives better perimeter shooting coverage than the 1-1-3. |
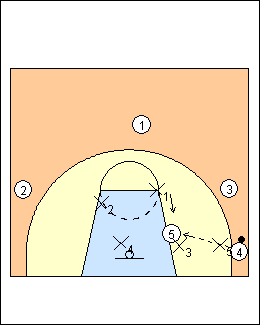
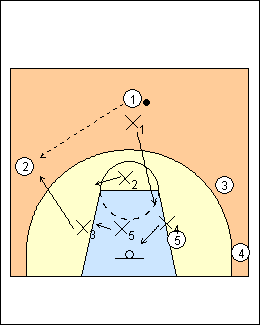
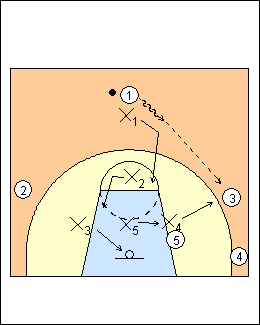 | 2 Smaller guard X1 picks up the ball between the two circles, forces it out of the middle, other guard X2 covers the high post whether or not there is an attacker, there could be a flash cutter. They move in unison, X2 slides a bit in the opposite direction. If one guard has the ball, the other has the high post. If 1 passes to the foul-line extended or below, a forward takes it. X1 drops to cover the high post (front an attacker), X2 has a weakside help position, X3 protects the basket. X5 goes over the top in front of 5 (he has to get to the corner on a pass to 4), on the line of deployment. Joe Haefner - Lute Olson 1-1-3 - X4 closes out, you can have X1 slide down to deny the high post, he prefers to have X2 slide over to deny and X1 slides to the weakside. X2 takes a pass back out top. Bob Huggins 1-1-3 - a forward has the first penetrating pass (X5 has a first pass to 3 or 4, up the line on 4). X1 denies a return pass to 1 (deny ball reversal), X2 has the high post (if one guard is out, the other is in). X5 fronts 5 but doesn't let 5 touch him. See Defence - Huggins pressure. Tubby Smith 2-3 Zone - with a ballside overload, X1 counts bodies and bumps down X4, who finds 4 in the corner. Syracuse 2-3 Zone - with shooter 4 in the corner, X5 will tell X4 to bump back (X1 takes the ball). Paul Hewitt Point Zone - X3 comes ballside with 4 in the corner, X2 protects the basket. |
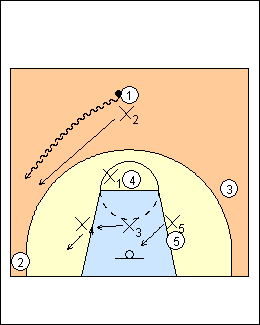
 | 3 On a pass back out to 1, X1 closes out, X2 has the high post. If there is a shot from the wing, the guards rotate away from where the shot is taken. X1 nails a high post or a weakside attacker. X5 can't box out 5 because he is fronting, X5 drop steps and attacks the rim. If there is only one weakside attacker, X3 can nail 5. Any good zone offence should have two weakside rebounders. |
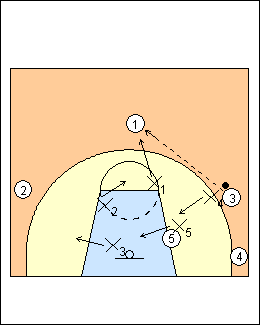
 | 4 On a pass to the corner, X5 closes out, X1 and X2 continue to cover the high post and weakside, X4 and X3 have two options: a) deep slide (shown) - X4 drop steps and sprints to get his head under the rim with vision (ball, weakside), X3 goes under 5 to get in front on the line of deployment. b) short slide - X4 drops to the line of deployment, X3 stays at the basket. Olson prefers the deep slide, but can use both if one forward is not tall so he doesn't have to defend the low post (but all forwards still cover out). If X3 is short, for example, then have X4 short slide on the pass to the corner, or if X3 has the ball on the wing, then he would deep slide on the pass. Haefner- X4 sprints to protect the basket and weakside block. X3 rotates over to defend the low post. Huggins - X4 dives to the block to front (short slide), X1 denies a return pass to 3, X2 still has high post. |
 | 5 On a pass into the low post from 4, X1 digs towards the ball, but has to be able to close out on a pass to 3. |
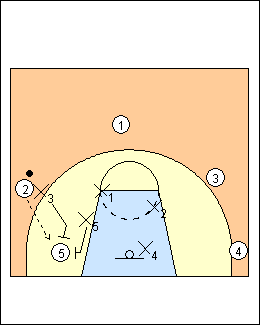
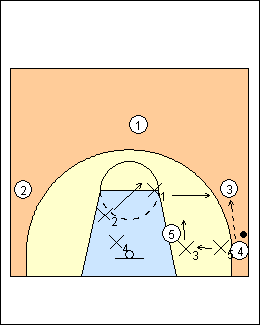 | 6 A guard takes any pass out of the corner. X1 closes out, X2 has the high post, X3 still has the middle, X5 moves in to a help position. It's the same thing if 4 dribbles out of the corner, X1 calls off X5, usually on about the second dribble (teams will drag you out on the dribble then bring a cutter underneath). Huggins - X5 jumps to the ball and denies a return pass to 4. |
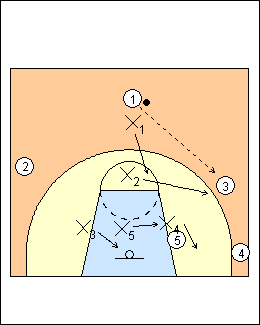
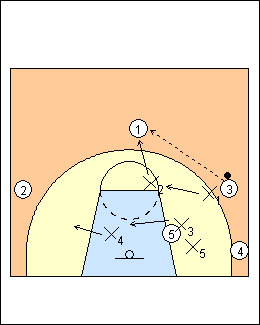 | 7 On a pass out top, X2 counts to two then closes out, giving X1 time to cover the high post (this is the hardest slide). (X4 would take a next pass to 2, see below.) On a skip pass, the closest and quickest defender takes the ball. The closest defender may be screened on the pass (but he should get foot advantage over a weakside attacker, with one foot over the attacker on either side). Note that having a guard take the ball on a wing gives stronger ballside coverage, but poorer weakside rebounding. |
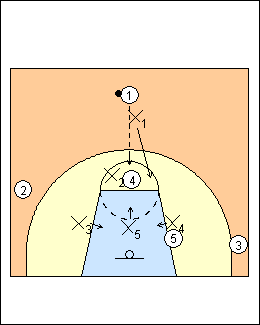 | 8 On a pass to the high post, both guards cover the pinch areas, the middle defender moves up about 4 feet away, the other two forwards have one foot in the lane. X4 has to be in front of 5 to get to 3 on a pass. If the high post turns and faces, X5 is in his face, he has no responsibility for a drive. If 4 puts the ball on the floor, X1 and X2 get it. If 4 passes to a wing, one guard closes out, the other covers the high post. Against a 1-4 high set, direct them one way, make them throw it to the wing, then it doesn't matter what they are in. |
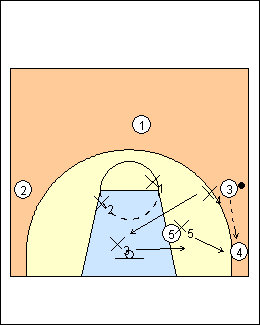
 | 9 If 4 passes to 3 in the corner, X4 closes out, it's easier for X3 to get in front of 5, X5 drops to the basket. |
 | 10 If 1 dribbles to a wing from the top, X2 stays with him, it's the same as a pass out from the corner. |
 | 11 Trap a pass to the short corner every time. X4 has the basket area. |
 | 12 "First pass, third pass" can be used against an overload - if a guard takes the first pass, then a forward will take the third pass, and vice versa. Here guard X2 takes an entry pass to 3 on the strongside, giving better coverage. If the ball is reversed to 2 on a third pass, forward X3 would take it. See Paul Hewitt Point Zone. |
 | 13 Here forward X3 takes the entry pass to 2 away from the strongside (there is no attacker down low), if the ball is reversed to 3 on a third pass, a guard takes it. If 2 dribbles to the corner, X3 would stay with him, there is no defender in the corner. A pass back out is guard coverage. Haefner - if the ball is reversed, X2 takes a pass to 1, X4 takes a pass to 3.  |
This page was made with Basketball playbook from Jes-Soft