 | 1 Hoop Tactics Use fullcourt pressure to - create turnovers and rushed shots - force the other team to advance the ball against pressure all 94 feet - increase the distance of passing lanes - disrupt normal offensive movements and tempo - remove and keep the ball out of the playmaker's hands. The ball is forced away from the middle of the court and passing lanes are aggressively denied. |
 | 2 Shadow Press The inbounds pass is not pressured, inbound defender X4 sprint releases to a support position 8 to 10 feet behind X1 and X2, denying any pass over the top. Once the inbounds pass is made X4 shadows the defender of the ballhandler, who forces sideline. From this position the shadow (rover) can trap, fake a trap and recover to his man (hold), or jump switch. Variations - defenders X1 and X2 face guard their checks to aggressively deny the inbounds pass (Shadow Face) - X4 first pressures the inbounds pass, then releases to the shadow position as the ball is inbounded (Shadow Up). |
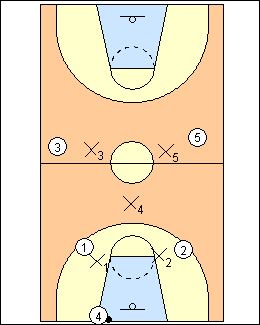
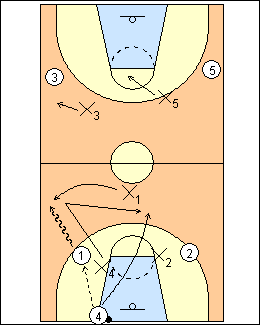
 | 3 Shadow trap X4 traps with X1 before halfcourt. X3 denies 3, X5 and X2 are in helpside positions. |
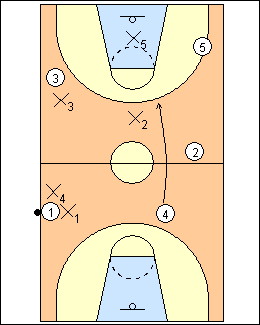
 | 4 On a pass to 2, X2 closes out on the ball, X5 closes out to deny 5, X4 sprints to take 4, X3 drops to a low help position, X1 denies 1. Canada Basketball Man-to-man rotation or zoning can be used to defend behind the trap. With man-to-man rotation, the defender who comes to trap is replaced by the nearest teammate, who is in turn replaced by another defender, leaving open the furthest attacker (post defenders can be left out of the rotation). If the trap is beaten, defenders must immediately recover, usually to a man-to-man defence (it may be possible to trap a second time on a pass near a sideline or in a corner). The easiest rotation is for the player who trapped to pick up the nearest open player. With zoning, defenders form a 2-1 zone behind the trap, with two interceptors covering three attackers and a safety covering the basket. Teams will often drop back into a zone when the trap is beaten. |
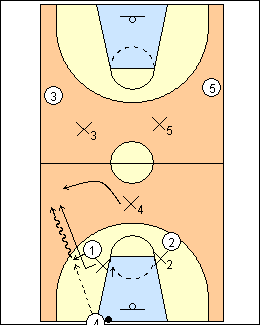
 | 5 Shadow hold (fake) X4 fakes a trap with X1 then sprint releases back to 4. Faking the trap works well if the ballhandler has a habit of picking up the dribble when double-teamed. |
 | 6 Shadow switch The jump switch option is used primarily as a surprise or change of pace, and against smaller line-ups. X1 inverts with X4 and takes the shadow support position. X4 forces the dribbler sideline then jump switches with X1, who attempts to draw a charge or force the ballhandler into picking up his dribble, while X4 sprint releases into a denial position on the inbounder. Mixing up the trap, hold, and jump switch options keeps the ballhandler off balance and guessing (option - jump switch with X4 in the rover position). Any time the rover can't get into position, or a deep or middle outlet pass is made, fullcourt pressure is off. |
 | 7 Shadow Blitz (trap) Instead of a rover position, X4 guards the inbounds passer. All-out pressure is applied on the inbounder and denying the inbounds pass, then X4 traps immediately on the inbounds pass. X2 denies 2, X5 and X3 rotate to helpside positions. Blitz hold - when the ball is inbounded, X4 denies a return pass to 4, with no trap (or fake trap). |
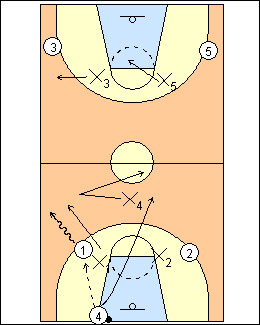
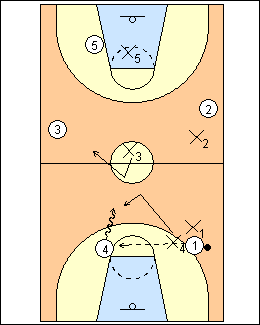 | 8 On a pass to trailer 4 out of the trap, X3 steps up and temporarily holds 4's dribble penetration [stunts] until X4 can recover to the ball. X1 denies 1.  |
This page was made with Basketball playbook from Jes-Soft